
Please find the citable PDF-version of the article here
In the next few decades, industrially produced biochar may become one of the key raw materials for the bio-based economy. Since the construction, electronics, paper making, waste water treatment, textile, 3D printing and other industries will all be competing for this biochar (see 55 uses of biochar), commercially-produced biochar will remain an expensive input for farmers to purchase. Small farmers may find that weighing the cost of farm labor against the cost of commercial biochar comes out in favor of making their own from accumulated farm, garden and household residues. This allows farmers to complete the resource loop on their own farms where biochar can enter the local use cascades (Schmidt, 2012; Shackley, 2014) and become the basis for the humus enrichment of soil.
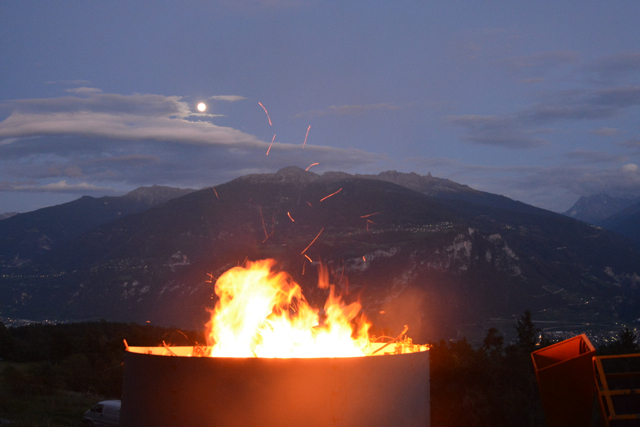
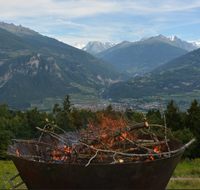
Fig. 1. Biochar production in the Swiss Alps.
People of many ancient and preindustrial civilizations produced charcoal and biochar in such quantities that it even became one of the causes for the deforestation of whole regions and countries (Carlowitz, 2013; Fang and Xie, 1994; Willcox, 1974). The charcoal they produced was mainly used to melt ore, to work iron, to produce lime, to fire ceramics or simply for cooking and heating, however, a considerable part of the finer charcoal fraction was used in combination with organic wastes to improve soil fertility (Criscuoli et al., 2014; Glaser and Birk, 2012). If the ancient peoples were able to produce such large quantities of wood and biochar, how can it be that in this age of high technology, we have not been able to successfully produce local, cost-effective biochar to be used on farm? How is it that the millions of euros and dollars spent on major biochar research projects have failed to develop a reliable and affordable pyrolysis system to give farms and communities access to biochar made from the residues they generate? How did our ancestors manage to produce, without chainsaws, steel, conveyor belts and electric motors, such substantial amounts of biochar that an average one-fifth of the humus content of the soils of the world is composed of biochar (Kluepfel et al., 2014; Rodionov et al., 2010; Schmidt and Noack, 2000)? Although the bulk of this biochar stems from natural causes, mostly forest and steppe fires, these fires were also the result, to some degree, of human agency (Gammage, 2012; Gerlach et al., 2012; Rodionov et al., 2010). There is no doubt, however, that within settlement areas where the proportion of biochar exceeds by a wide margin that found in other soils, the biochar was produced as a side effect of village fire management practices, and perhaps even deliberately produced and added to soil (Gerlach et al., 2012, 2006).
Learning from fire
Anyone who has ever tried to clear a hundred square meters of wild growing forest to make it plowable, even when chainsaw and backhoe are available, will see very quickly that fire helps. For 25,000 years of human history, fire was the most ubiquitous and important means that every culture, people and clan had to carve out a place to live in nature. Only through fire was humankind able to develop the intellectual and physical advantages he had over the other animals to access resources and adapt the environment to his benefit (see also Richard Wrangham’s excellent book: “Catching Fire: How Cooking Made Us Human”).Most folks who deal daily with fire, cook every meal, forge every tool and nail, burn lime, fire clay, warm themselves, and maintain their pastures and forests, learn how to light a fire that provides warmth without enveloping every house in the village with acrid smoke. Contrary to what one intuitively believes, a smokeless fire is lit from above and not from below.
The analogy of the match
Although it seems counterintuitive (see here the exciting field of intuitive physics, wood actually does not burn. Instead it is the gas emitted by heating the wood that burns. Only when the wood is finally charred under the flame of the woodgas, can oxygen penetrate the then porous structure of the newly charred wood and glow the carbon to ash.
Striking a match on the rough surface of the matchbox ignites a flaming chemical reaction of the sulfurous tip that generates enough heat to make the wood emit highly combustible gases. The flame ignites the gases so released from the wood and the process continues under the heat from the burning pyrolysis gases, causing further outgassing and burning of gas. But underneath the flame of the woodgas the wood itself does not burn but carbonizes, because the gas flame consumes all the oxygen, creating a pyrolysis zone where the flame protects the match from oxidation. As we know, the match burns with a clean flame until someone blows out the flame after which it will smoke. The smoke is just the last unburned and condensing residual wood vapors, released before the match cools sufficiently to stop outgassing them.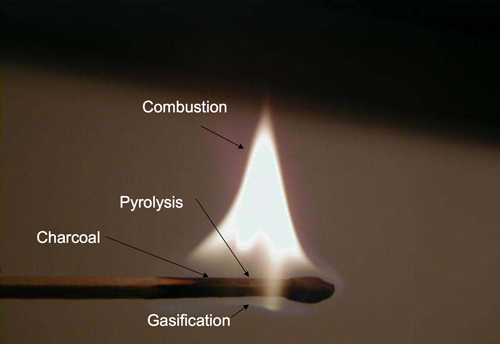
Fig. 2. The example of a match shows how the flame excludes oxygen allowing pyrolysis to take place (image: Thomas Reed)
A smokeless fire can be made to work just like a match. You light it from above, so that the fire in the uppermost layer heats the next lower layer, which consequently begins to outgas. The gas rises through the flame above, where it is burned. In contrast, when you light a fire from below, the heat will cause the wood layer above to outgas. Much of the ascending gas will escape the flame and condense in the cooler air. This is what we see as smoke. Instead of burning completely, the bottom lit fire sends smoke out the chimney or into the house, or into the clothes, eyes and noses of those seated around the campfire.
If you layer a wood pile loosely, with enough small branches in the upper layer, and light it at the top, nearly all the resulting wood gas will pass through the overlying flame front and burn so there is only a clean, smoke free combustion gas. Radiant heat from the flame chars the wood beneath layer by layer. Air is drafted in from the sides of the pile, but is updrafted into the flame and consumed in combustion. Under the nearly oxygen-free fire front the char is mostly preserved. As the pyrolysis reduces the wood chunks to smaller pieces that pass down through the loose pile, fresh layers of wood are continually exposed to off-gassing heat below the fire front. By observing the flame and the onset of ash build up on the outer layers of the charred wood you can determine the right moment to quench with water or smother with dirt, and instead of producing ash alone, you may retain close to a fifth of the wood as charcoal, while utilizing your smokeless fire to cook or to warm yourself.
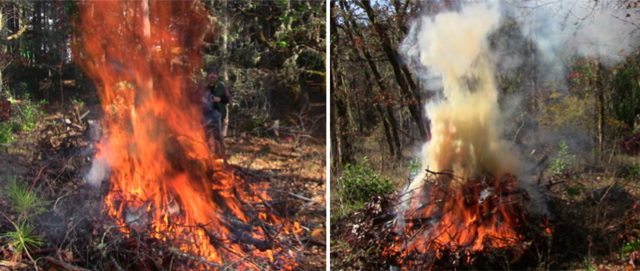
Fig. 3. These burn piles in the Oregon woods illustrate the difference between lighting a fire on the top (left) or lighting it near the bottom (right). Images: Kelpie Wilson.
From the basic principle of smokeless fire
The fundamental principle of the smokeless fire was the starting point for our design of the Kon-Tiki, an open-topped conical kiln for making biochar. We chose the name Kon-Tiki in memory of Thor Heyerdahl, who asserted in the ‘40s of the last century that the inhabitants of South America were able to cross the Pacific to Polynesia in handmade boats. The experts virulently attacked Heyerdahl's theory until he finally silenced them by building such a boat with only the tools and materials of the South American natives, and crossing half the Pacific from Lima to Polynesia. He named his boat Kon-Tiki after the South American god of sun and fire.
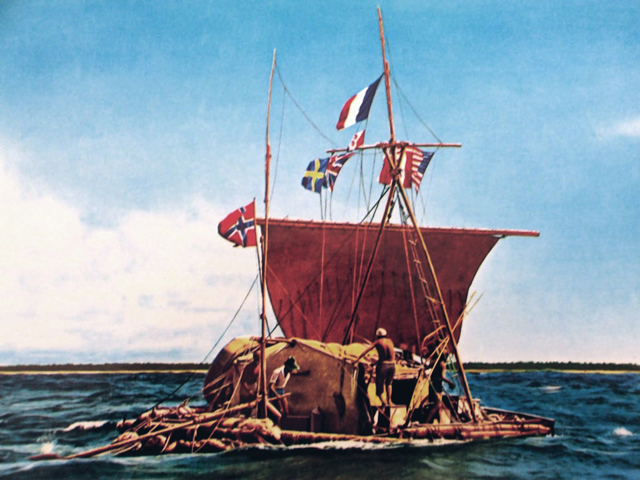
Fig. 4. With this raft, built only with native South American materials and tools, Thor Heyerdahl crossed half the Pacific Ocean in 1946. He named it after the fire god, Kon-Tiki.
Our goal was quite similar, although not nearly as adventurous. We wanted to show how our ancestors were able to produce with simple means and without high technology, large quantities of biochar. Additionally, we sought a simple, inexpensive, easily adaptable technology for a Terra Preta project in Nepal, where the mountain farmers cannot possibly engage with an unaffordable, high-tech pyrolysis machine. If earlier peoples in South America, Australia, Scandinavia, Palestine, China, and actually almost everywhere, were able to produce and apply such quantities of biochar that their soils were partially blackened throughout, this must be achievable today in even the poorest tropical countries. We also hoped to develop a technology that would allow farmers and gardeners in rich countries to convert their own residues into biochar as an alternative to buying it from industrial manufacturers.
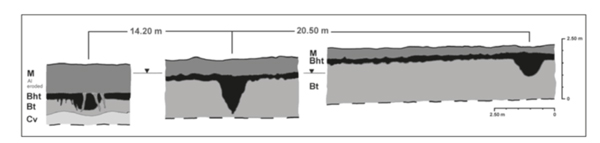
Fig. 5. Typical profile section of a soil west of Cologne. Among the superficial unconsolidated sediments is a black soil horizon containing deep black soil pits up to 2 m deep with high proportions of charcoal. (from: Gerlach et al 2012)
In our thinking, we began with the smokeless fire of the ancestors and combined this with the observations of archaeologists, namely that black soil deposits are often found in soil profiles as clearly demarcated cone pits with a upper diameter of about 2 m and a depth of 1.5 (Eckmeier et al., 2008; Gerlach et al., 2006). First, we suspected that these soil cones were simply rubbish pits, which, when they were filled, were burned from the top down, only to be replenished. In some instances, this will have been the case. But what if these man-sized pits were used as open pits for pyrolysis? We had to exercise now some experimental archaeology.
Open Earth Kiln
If you take care to build a strong initial bed of flaming embers at the bottom of the hole in the ground, gradually, layer by layer you can add combustible material such as wood, food scraps, bones, leaves and straw while maintaining a smoke-consuming fire front. The burning pyrolysis gas consumes most of the oxygen drawn into the pit by the flame and therefore protects the pyrolysis zone, while the earthen walls keep air out from the sides and below. The fire itself is so effective at excluding air that the underlying layers outgas and char instead of burning to ash. After a few hours, by the steady piling and outgassing of fresh biomass, one or more cubic meters of biochar accumulate that can then be quenched by water or by a 5-10 cm thick layer of soil, sand or manure.
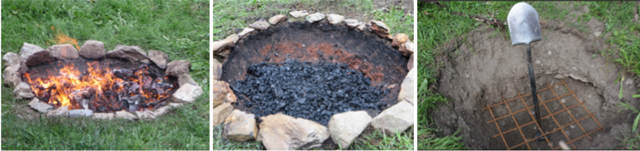
Fig. 6. Production of biochar in a 90 cm deep pit with a stone rim (Images: Ithaka-Institute).
Inspired by Josiah Hunt, we tested the production of biochar in an open earth kiln. And it worked just great. In the first attempt, we made a few hundred liters of excellent looking biochar in a conically excavated hole in the ground. This success was reason enough to construct a more precise theory about the system and to consider how it could be implemented with better technology and control.
With the fire, not against the fire
An investigation amid the global biochar community showed rapidly that we were not alone on the road of this development. At her most valuable Backyard Biochar website Kelpie Wilson had already presented examples of the Japanese Moki-Kiln, the Australian Moxham Kiln, Kelpie Wilson's own Pyramid Kiln and new cone and pyramid designs by Michael Wittman, Gary Gilmore and others. With the exception of the Moxham all these kilns are comparatively small and more suitable for gardeners and hobbyists, but the principle is clear: produce biochar using the fire and not by suppressing it. We also took as inspiration the form of fire containers that were used throughout the Orient for the offering of religious sacrifices. Under the name of Agni Hotra, the Vedic fire ritual, they are still widely used today in India. The size of the Agni Hotra bowls is generally small, but for temple rituals, there were larger fire bowls made of copper. The dynamics of smokeless flames over the fire pits, dancing to the heavens, clearly showed that we were on the right track with the physics of fire.
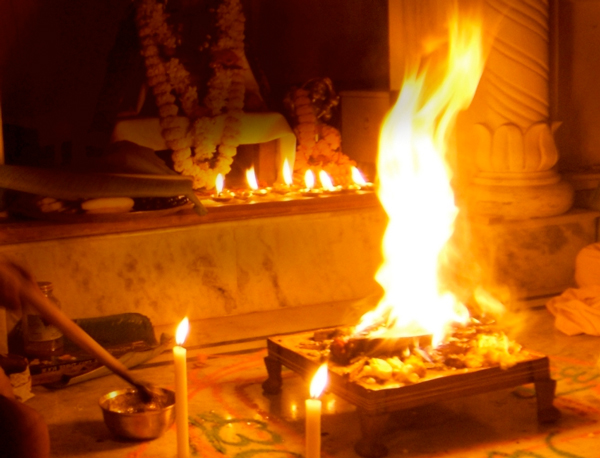
Fig. 7. The Vedic Agni Hotra ritual (image: agnikultur.
Based on these principles, which may mark a U-turn of the modern direction of pyrolysis for farm scale biochar production, we were now close to developing an optimized Kon-Tiki kiln for the production of high-quality biochar in large quantities and at very low cost. The first principle of Kon-Tiki art is this: Use the pyrolysis gases as cover gas and thus create with the fire the air exclusion for pyrolysis.
Kon-Tiki Cone Kiln
Although the biochar quality from the first experiments with an excavated earth kiln looked pretty good, it was too inhomogeneous for standardized products. The open combustion of the pyrolysis gases was fairly clean, but not always stable, especially in gusts of wind, and we were not able to completely prevent the emergence of smoke. We had to get one step further to study the operating principles more precisely and to optimize the different parameters of the system. At this stage we designed and built the first 750 liter aboveground Kon-Tiki made out of steel.
Figure 8. The first Kon-Tiki had a diameter of 150 cm, a height of 90 cm and a capacity of 850 liters. It was built by Markus Koller.
With an upper diameter of 1.50 m, a height of 0.90 m and a wall inclination of 63°, a steep cone shape was chosen so that the resulting biochar was well compacted and would make a consistent fire front at the surface for a reliable barrier to oxygen. Unlike the earthen walls in the earth kiln, the steel walls reflect the pyrolysis and combustion heat back into the kiln, resulting in a more uniform temperature distribution and thus ensuring more homogeneous charring conditions and resulting biochar quality. More importantly, the decisive criterion for the success of the new steel shape was the difference in combustion dynamics with the change from a sunken to an aboveground form. We found that the combustion air that is drawn down onto the burning surface is preheated as it rises along the hot outer wall of the kiln. Pre-heating the combustion air significantly reduces the cooling of the unburned gases, generating more stable combustion dynamics and greatly reducing smoke production.

Fig. 9. Air is drawn in over the hot outer wall of the kiln and swirls above the fuel bed creating a vortex that ensures good mixing of pyrolysis and combustion air, resulting in very low emissions of the Kon-Tiki kiln.
Once the kiln reaches its working temperature of 650°-700°C, hardly any smoke is visible. The combustion air rolls in over the metal edge of the outer wall and into the kiln. But at the same time, the burning gases must escape upwards and so, similar to a clockwork, a counter-rotating vortex is established in the center of the kiln (see Fig. 4). Thanks to the establishment of this horizontal vortex, the air supply to the fire zone is stabilized. The wood gas, which is heavier than air, is kept in the vortex until it is completely burned. Thus, the second fundamental principle of Kon-Tiki craft is the development of a horizontal gas-air vortex, which provides a stable, smokeless combustion regime.
Optimize combustion by providing a rim-shield
To further optimize combustion dynamics of the Kon-Tiki, we added a thin metal rim-shield. This provides additional preheating of combustion air that rises between the inclined kiln walls and the steel outer screen. Since the screen extends almost ten cm above the edge of the kiln, it prevents cold combustion air from being drawn directly into the kiln and protects the combustion dynamics from any disturbing gusts of wind. Indeed, the denser cold air that slides from the outside of the screen onto the preheated air stream from the space between the kiln and screen is extraordinarily stabilizing and prevents smoke or even fire from breaking out laterally from the Kon-Tiki. Another advantage of the screen is that the kiln wall is not cooled by the external air, or even gusts of wind, thereby improving the power of the kiln walls to reflect heat back to the interior of the pyrolysis zone. It also protects the workers from possible burns as the screen never heats to more than 60°C.
Fig. 10. Video showing the efficiency of the rim shield.
Drying and pyrolysis
As we had observed with the open earth kiln, the fire front at the surface quickly dries the biomass after it is laid down on the blaze. The massive heat released during pyrolysis is thus used as drying energy and wet biomass with a water content of over 50% can be carbonized. Once a high-energy fuel bed forms at the bottom of the Kon-Tiki, you can even pyrolyze freshly cut wood, leaves or cattle dung. The Kon-Tiki thus works both as a dryer and a pyrolyzer. Unlike most closed pyrolysis systems, this in itself is a major advantage. 
Fig. 11. Once a strong ember bed brings the pyrolysis temperature up to 700 ° C, fresh wood can be added. The Kon-Tiki functions as both a feedstock dryer and a pyrolyzer.
Ignition and First Layer
In the first experiment of firing a deep Kon-Tiki we feared that we had made it too deep, because deep down in the Kon-Tiki steel container, the oxygen is used up very quickly. In fact, it was impossible at first, even with a strong igniter, to start a fire. After several attempts and considerations we found a highly effective ignition technique that we marvel at anew every time we use it.
Start by building an open stacked square chimney of dry wood in the middle of the kiln and about three-quarters of the kiln height. This airy wood chimney is ignited at the top with some tinder. Once the top two rows of the fire are burning well, it creates a train that pulls air down the sidewalls of the kiln and back up through the middle of the wooden chimney. After about ten minutes, burning wood from the top of the chimney falls down the chimney and ignites the base. After another five minutes the entire burning “chimney” can be collapsed and spread evenly on the bottom of the kiln.
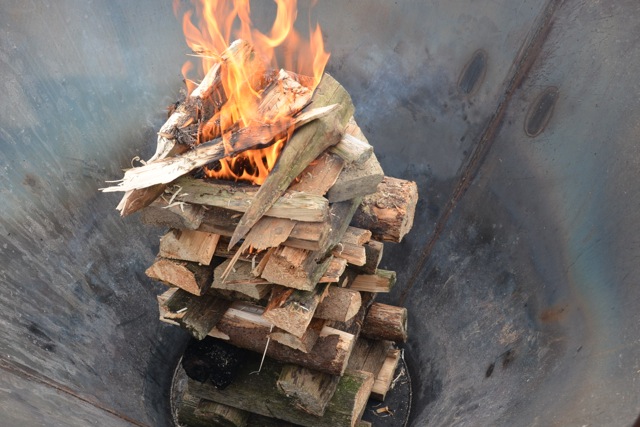
Fig. 12. igniting the wood chimney in the middle of the Kon-Tiki.
Another five to ten minutes later, a sufficiently hot bed of embers has been formed and the surface layer begins to be covered with white ash. This is the moment to add the first regular layer of biomass. Cover the zone of glowing coals evenly but not too thickly. Once this new biomass layer also becomes coated with white ash, this is the sign that the feedstock has solidly reached pyrolysis temperature and exothermic pyrolysis will continue even in the absence of flaming combustion. It is time now to add the next layer of biomass. This will maintain a powerful flame front above the pyrolyzing material to consume down-convecting oxygen while combusting the smoke, thus protecting the char. This process is repeated for all the subsequent layers every five to ten minutes until quenching. Consequently, working with the Kon-Tiki requires the constant presence of a person to add fresh biomass. If you wait too long, the char starts to oxidize, which reduces yield and increases the ash content of the biochar. Take care not to lay on too much, too fast as this will weaken the flame, reducing its ability to capture the fumes and allowing smoke to escape.
Fig. 13. When the top layer of biomass begins to coat with ash, it is the right time to add the next fuel layer. The biomass becomes completely charred then in the lower layers.
Firing Duration
Compared to an automated installation, the disadvantage of the Kon-Tiki kiln is that it must be hand fed during the entire period of operation. Depending on the type, lumpiness and water content of the feedstock, it takes two to eight hours to produce roughly 1 cubic meter of biochar in the latest version of the Kon-Tiki kiln with side angles of 70° . If one uses dry wood chips, it only takes about two hours; undried prunings take four to five hours; green wood with logs, branches and leaves takes up to eight hours. Again, depending on the biomass, one person can operate two to four kilns in parallel. On a working day, a person can thus produce with two to four kilns between 1 and 1.5 tons of biochar, which corresponds approximately to the daily capacity (in 24-hour continuous operation) of a medium sized industrial pyrolysis plant.
Fig. 14. Mounting the rim shield to optimize combustion dynamics.
Another significant advantage of the Kon-Tiki is that the biomass does not need to be homogenized, chopped or even pelletized, but may simply be layered as coarse pieces up to 120 cm long. However, the charring time is considerably longer than with dry, small-sized biomasses. When using fresh twigs and branches, the capacity of the Kon-Tiki corresponds approximately to the amount of biomass that accumulates in eight hours of landscape maintenance or while cutting firewood. Instead of tossing the branches and brush unsuitable for firewood on a big pile that very slowly rots, or is burned to mostly ash in a smoky fire, they can be charred in the Kon-Tiki.
Quenching
The Kon-Tiki should only be filled to a maximum of 10 cm below the top edge, otherwise the stable gas-air vortex will be disrupted and the charring of the upper layers will be uneven. As the Kon-Tiki becomes full, make sure the last two to three layers consist of only easily charred material such as thin branches or prunings, since larger pieces added in the final stages will either remain incompletely charred or will require too much time to burn, resulting in excessive ash production.
Quenching can take place either from the top or the bottom. We developed a method to quench from the bottom that works like this: About 20 minutes before the last layer is pyrolyzed, the water tap at the bottom of the Kon-Tiki is opened. Water flows slowly in from the bottom of the kiln. When the water meets the hot coals, it evaporates. The heated 600-700°C water vapor rises through the char bed, and not only makes for a slow quench, but partially activates the biochar at the same time. The hot steam serves to expel and react with condensates from the pores of the biochar. The biochar is thus cleaned, increasing the pore volume and the inner surfaces of the biochar. In this way, partially activated biochar is produced. The only specific surface area measurement taken so far was done for a Kon-Tiki biochar quenched from the top. This top-quenched biochar had a specific surface area of 289 m2 per gram. We hypothesize that vapor activation as described above will result in consistently higher surface areas. The fire in the uppermost layer of the Kon-Tiki is not snuffed by the steam, because the hot top layer of glowing coals, about 20 cm thick, floats on the rising water. Once you notice that the last coal layer begins to float, spray it with water from above to complete the quenching.
Fig. 15. Quenching from the top with water.
Alternatively, you can also completely douse the kiln from above, however, it would be to the detriment of the partial steam activation compared to the watering from below. The pore volume and the specific surface of the biochar would be smaller when doused from above. If you want to avoid wetting the char, so you can later use it, for example, as fuel charcoal, you can close the kiln either with an airtight lid or simply with a thick layer of dirt to snuff it out and allow it to completely cool. (Take care: this takes a long time and could lead to loss of char or fire if the lid distorts or the dirt leaks air.) The resulting “dry quenched” biochar is however much richer in condensates and also pollutants such as PAHs. For fuel charcoal, this may be good, since the condensates and pollutants burn well, but for biochar used as animal feed, certainly not. Our initial tests of using nutrient and mineral enriched water like liquid manure or liquid digestate for quenching are very promising for the production of carbon fertilizers or other enhanced biochars. However, this is a new field that needs further research.

Fig. 16. Crystal clear quench water is the best sign of clean pyrolysis.
The quench water can be left for a few hours or even days in the kiln. It drains out easily through the water tap at the bottom. The quench water looks clean and transparent, but it is soapy and has a very high pH. While the high pH is due to the approximately 10% ash which results from the open fire pyrolysis process, the soap is formed by the reaction of the ash with pyrolysis oils, which are expelled from the pores during quenching of the char. This soapy quench water is apparently excellent for pouring on fruit and vegetable plants. It discourages snails and fungus and generally acts as a tonic to the plants. The latter statement is based on personal observations of only two dozen plant species so far; systematic scientific investigations are still pending.
Quality
Biochar quenched with water generally fulfills all the requirements for the premium quality of the European biochar certificate (EBC). The open fire pyrolysis principle guarantees that the vast majority of the pyrolysis gas is expelled from the biochar and burned, not stuck on the biochar surfaces and pores in the form of toxic condensates (Bucheli et al., 2015). The biochar is additionally cleaned and partially activated when slow quenched with water from the bottom. Please find here an EBC analysis of a vine root biochar made with a Kon-Tiki.
Fig. 17. Beautiful open pore structure of the Kon-Tiki biochar. Image: Michael Hayes
The pyrolysis temperature in the Kon-Tiki is 650-700 °C with brief temperature peaks close to the flames going up to 750°-800°C. In this temperature range, the biomass, including its lignin, becomes completely charred. The result is a high-temperature biochar of high quality, which is particularly suitable for animal feed, as a litter additive, for manure treatment, for composting, for drinking water filtration, wastewater treatment and generally to bind toxins and volatile nutrients. The Kon-Tiki biochar is less useful for direct application to soil, since it might adsorb labile soil nutrients and bind plant-signaling chemicals. Be sure to enhance biochar from the Kon-Tiki with nutrients before using it as a soil conditioner biochar.
Gaps and Uncertainties
The development of the Kon-Tiki systems is still in it’s early stages and needs more systematic research. For the moment, the quality assertions are based on only one complete EBC analysis plus some additional academic lab data of Kon-Tiki biochars. Initial emission testing indicates that clean combustion is feasible, although a systematic investigation of the influence of feedstock composition, degree of humidity, particle size and stronger winds has still to be done. Yield was measured at rates between 15 and 20 percent on a dry matter basis which correspond to other high temperature pyrolysis chars, however, the influence of feedstock composition, humidity, particle size and the art of the char maker’s craft will all impact yield.
We are currently investigating differences in specific surface area and volatile organic carbon content of biochars produced at different heights in the kiln. Biochar at the bottom of the kiln stays much longer in the pyrolysis zone than biochar from feedstock added towards the end of the firing. At the bottom of the kiln biochar cools slowly and vapor activation is much shorter and at lower temperatures than in the middle or the upper parts of the kiln which result in different activation levels and biochar characteristics. Systematic research of these variances in function of the charring position inside the kiln is needed.
These uncertainties are important and we are looking forward to initiate and do more advanced research about these questions. However, these uncertainties are congruent with most of the scientific uncertainties of more technical pyrolysis systems.
Future
From the first attempt, the Kon-Tiki deep cone kiln worked better than we would have envisioned before we began. Nevertheless, everything was not as easy as it seems in retrospect. We spent many hours in the myriad attempts to optimize the shape and dimensions of the cone until the thermodynamic puzzles began to crack. What made it light work for us, however, was the magnificent pleasure it was to work directly with the fire. Each experiment lasted at least six, but usually eight to ten hours that we passed surrounded by the forest, on the terraces of the ancestors, facing the snow covered mountains. Sometimes we invited friends; often the children were there, who have long since become fire and biochar experts. It was the best summer of research. We filmed, photographed, carried out countless measurements and learned new measurement techniques.
Friendships have been strengthened by the fire while sharing the meals cooked on the Kon-Tiki. Just like our ancestors, we have experimented with the forces of primordial elements and discovered the awe of nature in a new way. In the age of high technology, we have put this hubris for a moment behind us. Like Thor Heyerdahl on his raft in the sea, we were shaking some foundations of the scientific and technical imagination. Just as the miracle of aging wine is based on the proper dose of air, that enemy of winemakers, so the quality of biochar, which could ultimately increase the fertility of our soils, is based on the proper dose of air and fire.
The first video that we released in July 2014 on YouTube (see fig. 8 above) has raced like the wind to reach many people around the world. It was clear from the beginning that we would make the design available as open source. Nevertheless, we have waited for the actual publication of this article on the Kon-Tiki craft, at the end of autumn 2014, to gather more knowledge about the principles of operation, to optimize the design and especially to gain more certainty about the quality of the biochar, the mass balances and emissions. However, based on just the preliminary videos and design documents we have made available, Kon-Tiki kilns have already been built in Australia, Ireland, Canada, California, England, Hungary, Switzerland and South Africa. More Kon-Tikis are under construction in Nepal, India, Indonesia, Hawaii, Germany and Malawi. In all the places where the Kon-Tiki produces biochar, enthusiasm is huge and to date no complications have arisen. On this basis, we expect that 2015 will usher in hundreds of Kon-Tikis all over the world pushing forward the democratization of biochar production.
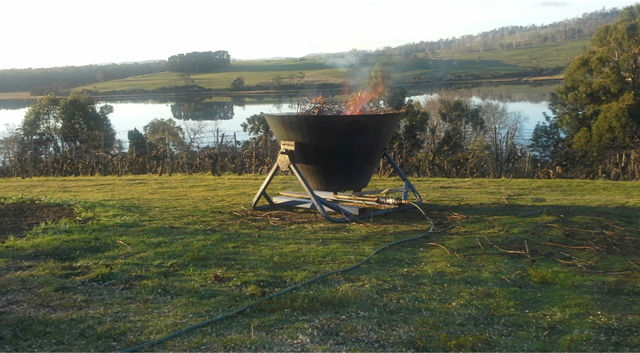
Fig. 18. Frank Strie was the first outside of Switzerland to build a Kon-Tiki. In Tasmania, he built five of his Kon-Tiki "Tas" kilns, gaining valuable experience in the process and promoting the technology. Frank Strie was the first to test the char activating bottom quenching method.
Originally designed for agriculture in developing countries, it is more and more apparent that the farmers of Europe, Australia and America will also seize the chance to make their biochar themselves and use the Kon-Tiki to optimize their agricultural material cycles.
What we call Kon-Tiki is not a finite form but the technical realization of the open fire kiln principal. And this has many inventors and will result in many varying designs. All are invited to participate in this movement to reappropriate the craft of fire and biochar making.
Next development steps
With numerous partners in various countries, we are currently working on optimizing the geometry and thermodynamics of the Kon-Tiki. For a North American university, we have just developed a research Kon-Tiki, with which all parameters can be monitored and combustion can be measured and controlled by metering the air intake. A giant Kon-Tiki was built to char large root wads with minimal size reduction for a composting facility. We also develop smaller sized Kon-Tikis for small gardeners who can use it to char their green residues and organic waste. The next technical development step will be the integration of heat recovery. One Kon-Tiki load produces more than 1 MWh heat, enough to heat a poorly insulated farmhouse for two weeks. These and other developments such as the automation of char removal will be the subject of future articles in tBJ.
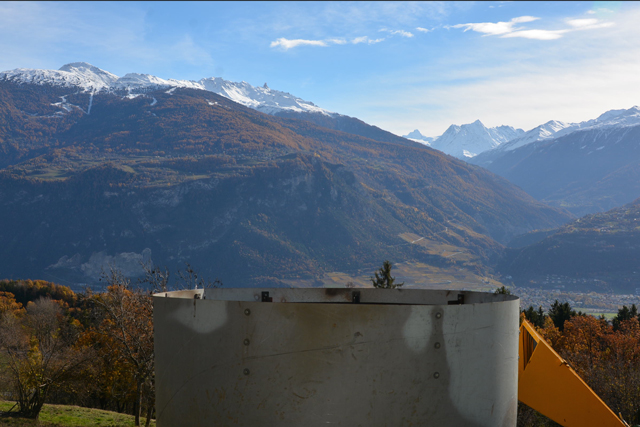
Fig. 17: A master of the Kon-Tiki craft will learn to pyrolyze with fire, and like in this picture, with no visible emissions. The cigare of the char master makes more smoke than the Kon-Tiki, which produces 1 MWh of heat in an afternoon.
The genius of the Kon-Tiki is in the elegance of the simple form and the avoidance of expensive moving parts and controls. Thus, the Kon-Tiki is robust and inexpensive. However, larger scale commercial and industrial biochar production require elaborate automation to reduce labor. This becomes far more of the cost than the basic reactor vessel and here the automated, continuously operated plants may remain unsurpassed. But for small and medium-sized farmers, landscapers, small winemakers (using their grape prunings) and gardeners who occasionally want to create their own high-quality biochar, there is no alternative that will be more efficient, less expensive or as supremely beautiful.
Build or buy and contribute
(August 1st 2016): We have started collaborations with manufacturers in several parts of the world to bring the Kon-Tiki to market. If you prefer to build it yourself or to start the production in your region, we are willing to share the design and building instructions in exchange for a modest donation to help us building the knowledge and technology for a more carbon intelligent world.
As the Kon-Tiki kilns quickly caught fire around the world, we started to share pictures and stories from Kon-Tiki craftsmen and craftswomen from the Amazon to Zambia, from Switzerland to Nepal, and from Tasmania to California on our world map of Kon-Tiki that contains already more than 50 countries. Please participate and send us your Kon-Tiki photos and experiences to be included in the world map of Kon-Tiki.
The Ithaka Institute has funded the entire development of the Kon-Tiki from our own resources, which has brought us to the limit of our financial possibilities. Since we provide the design as open source to farmers everywhere, we can draw no financial gain from this work. If, you, dear readers, would like to see further democratization of biochar production around the world, please support our work with a donation to the Ithaka Institute, so that we can continue our research for the development of the Kon-Tiki as well as other exciting projects which we hope to be able to share with you in the future.
Please download here the citable PDF version of the article
PS.: In the meantime we published some scientific articles about the biochar quality and emissions of Kon-Tiki kilns as well as about the application of Kon-Tiki biochar to enhance crop growth. These articles were published open source an can be downloaded for free (Fourfold Increase in Pumpkin Yield in Response to Low-Dosage Root Zone Application of Urine-Enhanced Biochar to a Fertile Tropical Soiland Emissions and Char Quality of Flame-Curtain "Kon Tiki" Kilns for Farmer-Scale Charcoal/Biochar Production).
Pyrolysis system should be locally resourceful and accessible!
This pyrolysis systems looks okay. However, to generalize that this system would now allow gardeners and farmers all over the world to be able to produce high quality biochar using this approach is somehow misleading as a matter of fact that those who most need the biochar technology are rural smallholders. Most smallholders might not be able to pay for the metal sheet used in this system. The most commonly used slow pyrolysis systems at zero cost would always be the traditional earth mound approach. I just completed a field research in Laos where I initially assumed that the metal drum approach would be great just to be faced with complications like the cost of drums (200 gallons for the retort and 100 gallon internal system, the kiln), excessive waste of burning additional biomass for the biomass in the kiln to turn to biochar, labor, time, and constant monitoring. After receiving feedbacks from smallholders associated with the metal drum pyrolysis systems that you see in Youtube videos, we switched to the modified traditional earth-mound approach, which cost us zero dollars, plus we didn't have to burn additional feedstock, time wise spend and we produce biochar from rice husk, which is one of the most common feedstock in most developing countries especially in Southeast Asian countries. I am wondering how would the quality of rice husk biochar turn out to be with this pyrolysis system as it seems to be less effective for rice husk feedstock, but better with wood. Here is a link to some of our work: http://jmacedo1.wordpress.com/category/field-trips/. Overall, the system looks great, how feasible it would be is another issue that needs to be considered.